
REACT, headless, routing or data fetishing, it may seem complicated... But don't panic, we'll explain how it works. First, try to demystify the basic concepts and terms associated with headless.
- Classic WordPress: This is a classic WordPress site, with a front and back, a classic folder structure, a classic WordPress theme, etc.
- WordPress headless : is a classic WordPress site, but without a forehead. It has no WordPress theme, but a React front.
- React: This is a front-end development framework based on JavaScript.
- Routing: This is the management of the routes of application (the equivalent of the WordPress permalians).
- Data fetching: it's about recovering data from the WordPress site (equivalent to SQL requests, but from a REST API).
- REST API: This is an architecture of URLs that allows to recover data from WordPress site.
- Hurry. This is a build tool for React (you can also use Create React App but we will use Quick in this article).
1. Why use React with WordPress?
Using REACT in a WordPress context is above all a technological choice. But why? It is true after all, there are thousands of WordPress themes, why make life complicated with React? Well, for several reasons.
Indeed, when we develop a classic WordPress site, we are often limited by the fact that HTML, CSS and JavaScript code is generated on the server side. This means that HTML, CSS and JavaScript are generated before the browser displays. And WordPress loads by default a large amount of resources to generate the page.
And this can become a problem when we want to create modern and efficient interfaces. Often, the preferred solution is the setting up of cache solution for WordPress pages. But this does not solve all page performance problems.
Using React in a WordPress context is above all a technological choice, to create modern and efficient interfaces.
So we will use React to generate the front-end of an existing WordPress site. And we will use React Router to manage the roads on our site. The choice of REACT Router is based on the fact that it is popular and reliable tool, but you can use other tools like NextJS, Gatsby, react-router-dom, etc.
1.1 The differences between a classic WordPress site and a WordPress site headless
| Criteria | WordPress « classic » | WordPress headless |
| Page rendering | Server side generated by PHP & themes | Customer side generated by React (or optional SSR) |
| Linking content / presentation | Strong | Low |
| Perceived performance | Full reloading | Fluid navigation (SPA) |
| Attack surface | PHP exposed | API only exposed |
| Stack front-end | PHP, HTML, CSS, JavaScript | Free (React, Tailwind, etc.) |
1.2 The advantages of WordPress as back‐end
Using WordPress as a backend offers several advantages. Indeed, WordPress is a powerful and flexible tool that allows you to easily manage the contents of a website, so this makes it the solution to prefer for most sites.
WordPress has:
- A rich ecosystem (plugins, Gutenberg, WooCommerce).
- A familiar admin interface for editors.
- Managing permissions, users, roles, etc.
- A ready to use REST API.
And it is this REST API that will allow us to recover data from our WordPress site. By default, only a few endpoints are available, but we can add as much as we want thanks to WordPress hooks. Therefore, depending on whether we are authenticated or not, we can have access to different information.
An API returns JSON data, which is very convenient for integration with React. For example, if you visit this URL https://en.wordpress.org/wp-json/wp/v2/posts, you will get a list of articles in JSON format. And it is this JSON data that we will recover and display in our React application.
1.3 The strengths of React front-end side
Unlike a classic theme or a FSE theme, a React application allows to generate a fully decorated front-end of WordPress. The main advantages are:
- A fluid user experience (SPA).
- Use of reusable components.
- A huge JS ecosystem (IU kits, i18n, tests, etc.).
- The possibility of adding SSR (server-side rendering) later if necessary.
2. Creating a React application related to WordPress
In this tutorial, we will use Quick to create our React application. Quick is a build tool for React that allows you to create a React application easily and quickly. But to begin with, we will need the items listed below.
2.1 WordPress Prerequisites
- A functional WordPress site.
- Permalians configured on « Article name ».
- In some cases, CORS opened to the domain/front (plugin or headers server).
2.2 Creating a REACT application with Quick
We will use the terminal for most actions, including creating files and folders for our application. However, Quick will create for us a local working environment that will allow us to develop our application. There is no need to create a local server, Quick will allow us to launch our React application locally.
Let's start by creating our React project with Quick. In your terminal, run the following command (wp-react-front is the name of our project, you can modify it if you wish):
# Lance l’assistant Vite
npm create vite@latest wp-react-front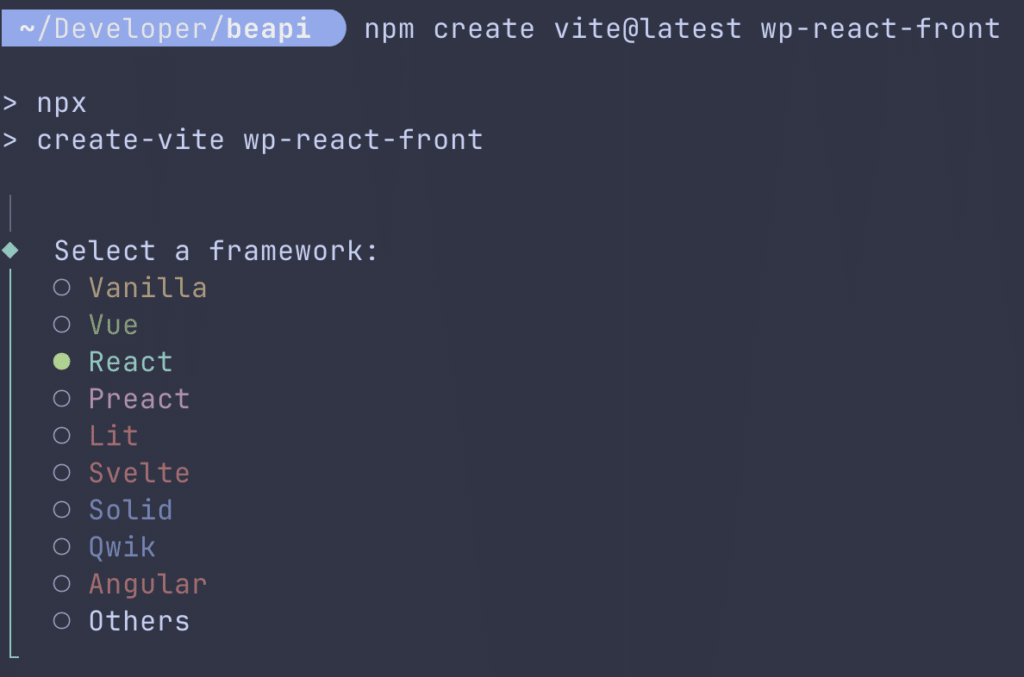
Then select the following values:
- Select a framework: › react
- Select a variant: › React Router v7

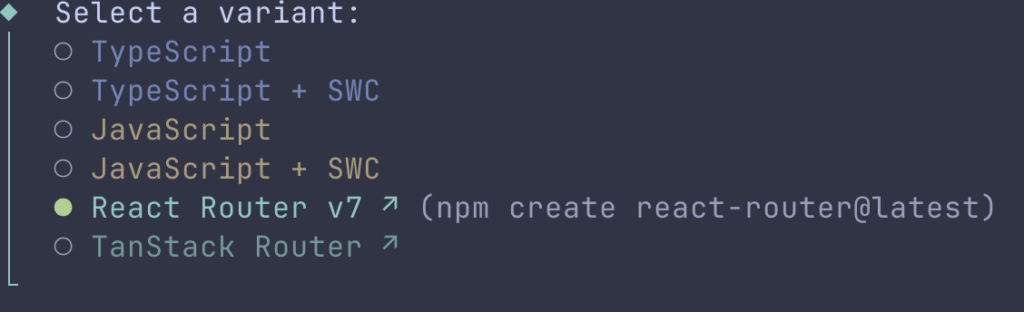

Then follow the procedure using the default values, then once the project is created, enter the folder and install the dependencies:
cd wp-react-front
npm install
We will now configure the address of the WordPress site we wish to use. This command to create a file .env.local at the source of the project and provide the address of the WordPress REST API. Using a file .env.local allows you not to submit this information on the directory used for versioning.
echo "VITE_WP_API_URL=http://mon-wordpress.local/wp-json" > .env.localYou should then have a tree similar to this one:
wp-react-front/
 ├─ app/
 │   ├─ root.tsx            # point d’entrée React Router (TypeScript)
 │   ├─ routes.ts           # définition des routes
 │   ├─ routes/
 │   │   └─ home.tsx        # page d’exemple
 │   └─ ...
 ├─ react-router.config.ts  # config du routeur
 ├─ vite.config.ts
 └─ ...
In this tutorial, we use TypeScript. If you prefer pure JavaScript, choose the variant « JavaScript »then npm install react-router-dom@latest and follow the structure src/ classic.
At this stage, our project is already functional in the sense that we can access the home page of our React application. Now we have to do what is necessary to connect this REACT application to WordPress.
2.3 Clean the application and create our own files
We will first clean the application by deleting unnecessary files and folders that were created by default.
# Supprimez les fichiers de démo
rm -rf app/welcome app/routes/home.tsx
Then create the necessary files for our application.
# Créer les fichiers nécessaires
mkdir -p app/components
 touch app/main.jsx \
       app/components/PostsList.jsx \
	   app/components/Post.jsx \
       app/App.jsx \
       app/App.css \
	   tailwind.config.js \
This last command will create the files that will constitute our React application.
- main.jsx: the entry point of our application.
- components: the folder that will contain our REACT components.
- App.jsx: the main component of our application.
- App.css: the CSS file of our application.
- tailwind.config.js: the configuration file of Tailwind CSS.
- PostsList.jsx: the component that will display the list of articles.
- Post.jsx: the component that will display the detail of an article.
3. Creating roads
When we browse a WordPress page, we can see that the URL changes according to the page we view.
For example, if we are on the home page, the URL will be http://mon-wordpress.local/
If we are on the articles page, the URL will be http://mon-wordpress.local/posts/
Finally, if we are on the page of an article, the URL will be http://mon-wordpress.local/posts/mon-article/
This is due to the fact that WordPress manages server-side routing and that we must do the same so that our React application works the same way.
For this, we will use the route.ts file in the app folder and we will define the routes of our application. This will allow the application to know what to display based on the URL visited.
// app/routes.ts
import type { RouteObject } from "react-router";

// Definition des routes.
const routes: RouteObject[] = [
	{
		path: "/",
		file: "./routes/_index.tsx"
	},
	{
		path: "/post/:id",
		file: "./routes/post.$id.tsx"
	}
];

export default routes;
What we indicate here is that we have two roads:
- The route / which will display the home page of our application and load the component
PostsList.jsx. - The road
/post/:idwhich will display the details of an item and load the componentPost.jsx.
It may be noted that there are more complex routing systems, including NextJS, but we will be content here with these two roads at the moment.
We will now edit the files corresponding to these routes. The host route code will be as follows:
// app/routes/_index.tsx
import PostsList from "../components/PostsList";
import type { LoaderFunctionArgs } from "react-router";

const API_URL = import.meta.env.VITE_WP_API_URL;

// Récupération des articles côté serveur.
export async function loader({ request }: LoaderFunctionArgs) {
	try {
		const response = await fetch(`${API_URL}/wp/v2/posts`);

		if (!response.ok) {
			throw new Error(`API responded with status: ${response.status}`);
		}

		const posts = await response.json();
		return { posts };
	} catch (error) {
		console.error("Error fetching posts from server:", error);
		return {
			posts: [],
			error: error instanceof Error ? error.message : "Unknown error"
		};
	}
}

// Retourne le composant PostsList.
export default function Index() {
	return <PostsList />;
}
What this code does is that when we are on the home page, we recover the articles from the WordPress REST API and we display them in the component PostsList.jsx.
We must also create the road to detail of an article.
// app/routes/post.$id.tsx
import Post from "../components/Post";
import type { LoaderFunctionArgs } from "react-router";

const API_URL = import.meta.env.VITE_WP_API_URL;

// Récupération des données du post côté serveur.
export async function loader({ params }: LoaderFunctionArgs) {
	try {
		const { id } = params;
		const response = await fetch(`${API_URL}/wp/v2/posts/${id}?_embed`);

		if (!response.ok) {
			throw new Error(`API responded with status: ${response.status}`);
		}

		const post = await response.json();
		return { post };
	} catch (error) {
		console.error("Error fetching post from server:", error);
		return {
			post: null,
			error: error instanceof Error ? error.message : "Unknown error"
		};
	}
}

export default function PostDetail() {
	return <Post />;
}
Here we do exactly the same as for the host route, but this time we recover the data from the post-server side and display it in the component Post.jsx.
These two files will allow us to retrieve data from articles and item details and display them in our React application via the components PostsList.jsx et Post.jsx.
We have already created these components in the app/components folder. We now need to modify the corresponding files to be usable by React Router.
// app/components/PostsList.jsx
import { Link, useLoaderData } from 'react-router';

export default function PostsList() {
	// Récupère les articles.
	const { posts = [], error: loaderError } = useLoaderData();

	if (loaderError) {
		return (
			<div>
				<h1>Erreur lors du chargement</h1>
				<p>Impossible de charger les articles: {loaderError}</p>
			</div>
		);
	}

	return (
		<div>
		<h1>Articles du blog fr.wordpress.org</h1>
		<ul className="space-y-6">
			{posts.length === 0 ? (
				<p>Aucun article trouvé</p>
			) : (
				posts.map(post => (
					<li key={post.id}>
						<h2 className="text-xl font-bold mb-2">
							<Link to={`/post/${post.id}`}>{post.title.rendered}</Link>
						</h2>
						<div
							className="prose"
							dangerouslySetInnerHTML={{ __html: post.excerpt.rendered }}
						/>
					</li>
				))
			)}
		</ul>
		</div>
	);
}
and component code Post.jsx shall be as follows:
// app/components/Post.jsx
import { Link, useLoaderData } from 'react-router';

export default function Post() {
	// Récupère les données du post.
	const { post, error } = useLoaderData();

	if (error) {
		return (
			<div>
				<h1>Erreur lors du chargement</h1>
				<p>Impossible de charger l'article: {error}</p>
				<p>
				<Link to="/">← Retour à la liste</Link>
				</p>
			</div>
		);
	}

	if (!post) {
		return (
			<div>
				<p>Chargement de l'article en cours...</p>
			</div>
		);
	}

	return (
		<article className="prose mx-auto">
			<h1 className="text-3xl font-bold">{post.title.rendered}</h1>
			<div dangerouslySetInnerHTML={{ __html: post.content.rendered }} />
			<p className="mt-8">
				<Link to="/">← Retour à la liste</Link>
			</p>
		</article>
	);
}
You can note that we use the component Link React Router to create links between pages. The advantage of this component is that it allows to create links that work in the React application, i.e. when we click on a link, we are not redirected to a new page, but we stay on the same page and the content is updated. The page is not fully reloaded, but only the content of the page is updated. This is one of the main advantages of React applications.
Note also the use of type classes text-3xl font-bold or prose to format the content. This comes from the use of Tailwind CSS, which is a very powerful and widely used CSS framework, unfortunately little in WordPress environments. Yet it is an excellent tool in a REACT context.
Well, we created roads and components. All we have to do is configure the router.
// react-router.config.ts
import type { Config } from "@react-router/dev/config";

export default {
	ssr: true,
} satisfies Config;
Finally we can modify the main files of our application, root.tsx and main.jsx to enable the application to function.
The root.tsx file acts here as a layout, i.e. it will contain the content of all pages of our application.
// app/root.tsx
import { Outlet, Meta, Scripts } from "react-router";
import "./app.css";

export function meta() {
	return [
		{ charset: "utf-8" },
		{ name: "viewport", content: "width=device-width, initial-scale=1" },
		{ title: "WordPress React Front" },
		{ name: "description", content: "WordPress React Frontend" }
	];
}

export default function Root() {
	return (
		<html lang="en">
			<head>
				<Meta />
			</head>
			<body className="bg-white dark:bg-gray-950 text-black dark:text-white">
				<div id="root" className="max-w-4xl mx-auto px-4 py-8">
					<Outlet />
				</div>
				<Scripts />
			</body>
		</html>
	);
}
File main.jsx is the entry point of our application.
// app/main.jsx
import React from 'react';
import ReactDOM from 'react-dom/client';
import App from './App.jsx';
import './app.css';

ReactDOM.createRoot(document.getElementById('root')).render(
	<React.StrictMode>
		<App />
	</React.StrictMode>
);
We created the necessary files and configured our application for it to work. All we have to do is launch our application and test it. To do this, we start the following order: npm run dev
The terminal will show us a URL, usually http://localhost:5173, we can visit to see our application. If everything works properly, we should see the blog articles list en.wordpress.org. When we click on an article, we are redirected to the post page and we can see the content of the article. So we have a site that displays WordPress data with a React application.
Of course, this REACT application is very simplistic. But it allows us to understand how we can use React to display WordPress data. We will see in the rest of the articles dedicated to REACT how to add pagination, cache, better routing system, etc.
The list of articles appears as follows:

The details of the article are as follows:

Conclusion
WordPress is a content manager that offers the possibility to use its data via a REST API. This REST API allows you to recover WordPress data and use it in a React application. We saw how we can use this REST API to power our React application and how we can use React Router to manage the routes of our application.
We also saw how to use Tailwind CSS to format our application.
We will see in the rest of the articles how we can develop this application so that it is more efficient, safer, more optimal, etc.